


SWiSHmax · SWiSH Max2 Max2 has everything you need to create fully interactive Flash animations. Learn More | Download | Purchase ...
www.swishzone.com/ - 53k -
More results from swishzone.com »
Showing posts with label SwishMax Examples. Show all posts
Showing posts with label SwishMax Examples. Show all posts
SWiSH - Easy Flash Animation Software Tools and Designer Templates
0 commentsHow to play a movie in reverse
0 commentsThis tutorial will show how you can set up your movie to play, pause, and rewind (play in reverse). You can use it on all of the movie, or on a single sprite, depending on how you set it up.
View Tutorial: http://www.13dots.com/reverse.html
swi is attached for personal viewing. Just download the swi and play it.
Have fun.
Creating a Progress Slider for SWiSHvideo
0 comments| Title: | Creating a Progress Slider for SWiSHvideo |
| Description: | This tutorial shows you one method for creating a re-usable progress slider (sometimes called a 'seek slider') that will allow the viewer to easily change the position of the movie (fast forward/rewind). The aim of this method is to create custom controls for use with SWiSHvideo, but it can be used in many other situations as well - such as standard animation or streaming audio files. |
| Website: | http://www.swishzone.com |
Adding Video into your SWiSHpix Gallery
0 comments| Title: | Adding Video into your SWiSHpix Gallery |
| Description: | SWiSHpix now has support for 'clips' - which allow you to add .SWF files into any or all slides within your gallery. This new feature works great with SWiSHvideo files. Add a whole new dimension over the standard still image photo galleries by adding motion video! |
| Website: | http://www.swishzone.com |
Using Events to Synchronize Animation and Video
0 comments| Title: | Using Events to Synchronize Animation and Video |
| Description: | With the introduction of Events in SWiSHvideo2, it opens up many possibilities with custom video. You can use these events to trigger animation sequences, play audio files, or perform complicated actions in relation to your video file. This tutorials focuses on synchronizing animation from SWiSHmax with Events in SWiSHvideo2. |
| Website: | http://www.swishzone.com |
Creating a Chapter Menu for SWiSHvideo2
0 comments| Title: | Creating a Chapter Menu for SWiSHvideo2 |
| Description: | Learn how to create your own Chapter menu (or Event menu) that allows the viewer to quickly jump to a specific point in the video. |
| Website: | http://www.swishzone.com |
Importing SWiSHvideo .SWF Files into SWiSHmax
0 comments| Title: | Importing SWiSHvideo .SWF Files into SWiSHmax |
| Description: | SWiSHvideo gives you the option to export your video files into an importable JPEG sequence. That file can then be imported directly into SWiSHmax (for positioning or further editing), this tutorial will show you how to import your video and synchronize audio to it. |
| Website: | http://www.swishzone.com |
Simple Image Slde Show
0 comments
Step 1: Open a new document, I made it 300x300 on this tutorial. You can change the size in the movie panel. Step 2: Add your pictures to the document, Insert-Images
Step 3: Right click on the first frame of first picture, Effect-Slide-In From Left To add more frames to your slide, First you will right click on the first box saying "Slide In From Left" the following will show up. You want to select Properties, then in the top you want to change the Duration: to 200 frames. Repeat this process to add 200 frames to your "Slide Out To Right" effect.
Step 4: Make a second effect so the picture will slide out. To do this do what you did to make the first effect, right click on last frame of your first picture, go to Effects-Slide-Out To Right. Now your picture will Slide in from the left and exit to the right.
Step 5: Copy your first Effect from your first picture and paste it into your second picture. To Copy hit "Ctrl-C" the to paste hit "Ctrl V" Also be sure to paste the Effect for the second Picture right after the last effect of the first picture.
Step 5: Copy the second Effect form your first picture and paste it after the second pictures first Effect.
You then repeat Steps 4 and 5 to add effects to all your pictures.
Download .SWI
How to Create Animate Button in SWISHMAX
0 commentsSTEP 1: Create 2 object, i use one shape and text on it, select objects (SHIFT+Click on each object to select), right click on the objects, Grouping-Group as Sprite 
STEP 2: Right click on sprite, Grouping - Group as Button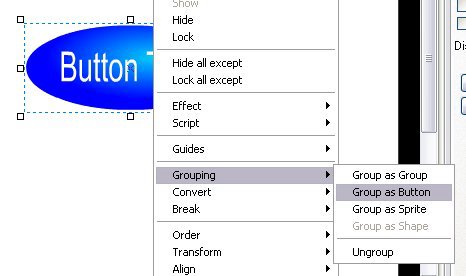
STEP 3: on the Button Panel, check on Has Separate Over State
STEP 4: Expand the button state by clicking on the + sign, open the sprite at OVER STATE, you'll see the shape and text are in the sprite.
STEP 5: last, right clik on timeline at first frame of the text, Effect - Fade - fade In
STEP 6: play the movie, rollover your pointer on button to see how it works
Download Source
swishmax Simple Buttons
0 commentsthis is just a sample how to create simple button in swishmax
1. create an object
2. right click the object, Convert-Convert to Button
3. to modify a button, klik the button name, on button panel, select on Has Separate Over States,
4. expand the button, look at the Over State, klik on the object, change the color or you can put any object there.
Download .SWI
Swishmax Externally Loaded .txt files
1 commentsFirst, create your text file. Do this with a basic notepad. I am going to use the variable mymessage, so my .txt file would be formatted like this:
&mymessage= Hi, this is my message
Welcome to my site!
More stuff here and here
-----END&
Make sure to add the &'s at the beginning and end. Now just save your .txt file as text.txt(Also, check the .txt file in the download) Now open up your swishmax. Create a dynamic text file, name it message, click the target button and give it the variable of mymessage(or the same thing in your .txt file)..and add this code to your scene:
onLoad () {
loadVariablesNum("http://yourdomain.com/text.txt",0,'GET');
}
Please change the http://yourdomain.com/text.txt to your file, or you can keep it there, because I have a file that is uploaded there Now we will do the easiest part, the scroll buttons (Too hard to explain scrollbars or anything like that) So make a up button, with the code:
on (press) {
Message.scroll -= 1;
}
and a down button with the code:
on (press) {
Message.scroll += 1;
}
Both these refer to Message, which is what I put in the name of the text, not the variable. Hope this helps... Also, I would like to include this info from John: Also while your at it try altering the TEXT to the HTML format [in the "text" section select "Formatting" and then select " <> " "render text as HTML" ] ( much clearer text and then do things like add colour and links such as Swish Tutorials to the notepad text file..
Load External Movie for new SWISHMAX user
0 comments1. Create 2 movie, name it to red.swi and blue.swi, export each movie to .swf format
2. For the main movie, create new movie with the same size with the other 2 movie to load. i use 2 button to load the movie here
3. let get to the script, click on the firts button (red button) . open the Script panel, Add Script-Movie Control- Load Unload Level- Load Movie [num]
4. that's it, follow the first steep for secaond button
Example | Download .SWI
Spotlight Effect using Masking in SWISHMAX
0 comments
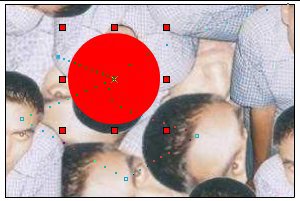
This is another simple masking effect animation to create a simple spotlight effect in swishmax. on this one, i use MOVE Effect to move the circle shape, you can use another effect in the same way.
Download SWI file

Advanced Masking : The Clouds
0 commentsthis is another example how masking in SWISHMAX can use to create moving Clouds Effect
Download .SWI
Another example i've made and send it to Swishzone can be preview on swishzone site
Subscribe to:
Posts (Atom)